
Migrate my note flask app from ecs to pi
So to cutdown some cost on hosting my tnote flask app - tnote.tdinvoke.net, I’m hoping to move it down to my pi4. But I don’t want to deal with port forwarding and ssl certificate setup. So enter cloudflare tunnel, it’s not perfectly safe as cloudflare can see all traffic going to the exposed sites but since these are just my lab projects, I think I should be fine.
I need to use my tdinvoke.net domain for the sites, so I had to migrate my r53 dns setup over to cloudflare.
- Move all my dns records to cloudflare manually. I don’t have much so it’s pretty painless. Note: All my alias records to aws cloudfront need to be created as CNAME - ‘DNS only’ on cloudflare.
- Point my registered domain name-servers to cloudflare name-servers.
Migration from ecs was not too bad since I just need to spin up the containers on my pi.
Here’s an overview flow of the setup:
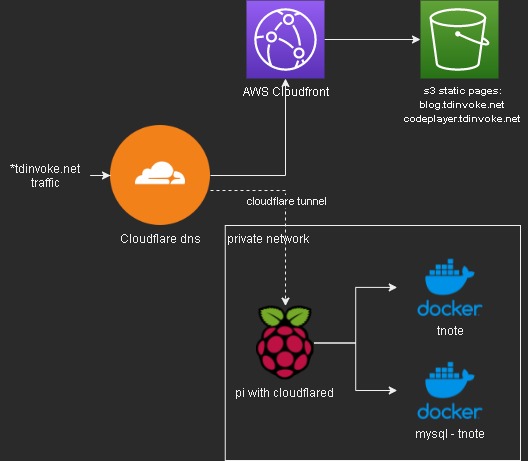
More information on cloudflare tunnel and how to setup one - here.
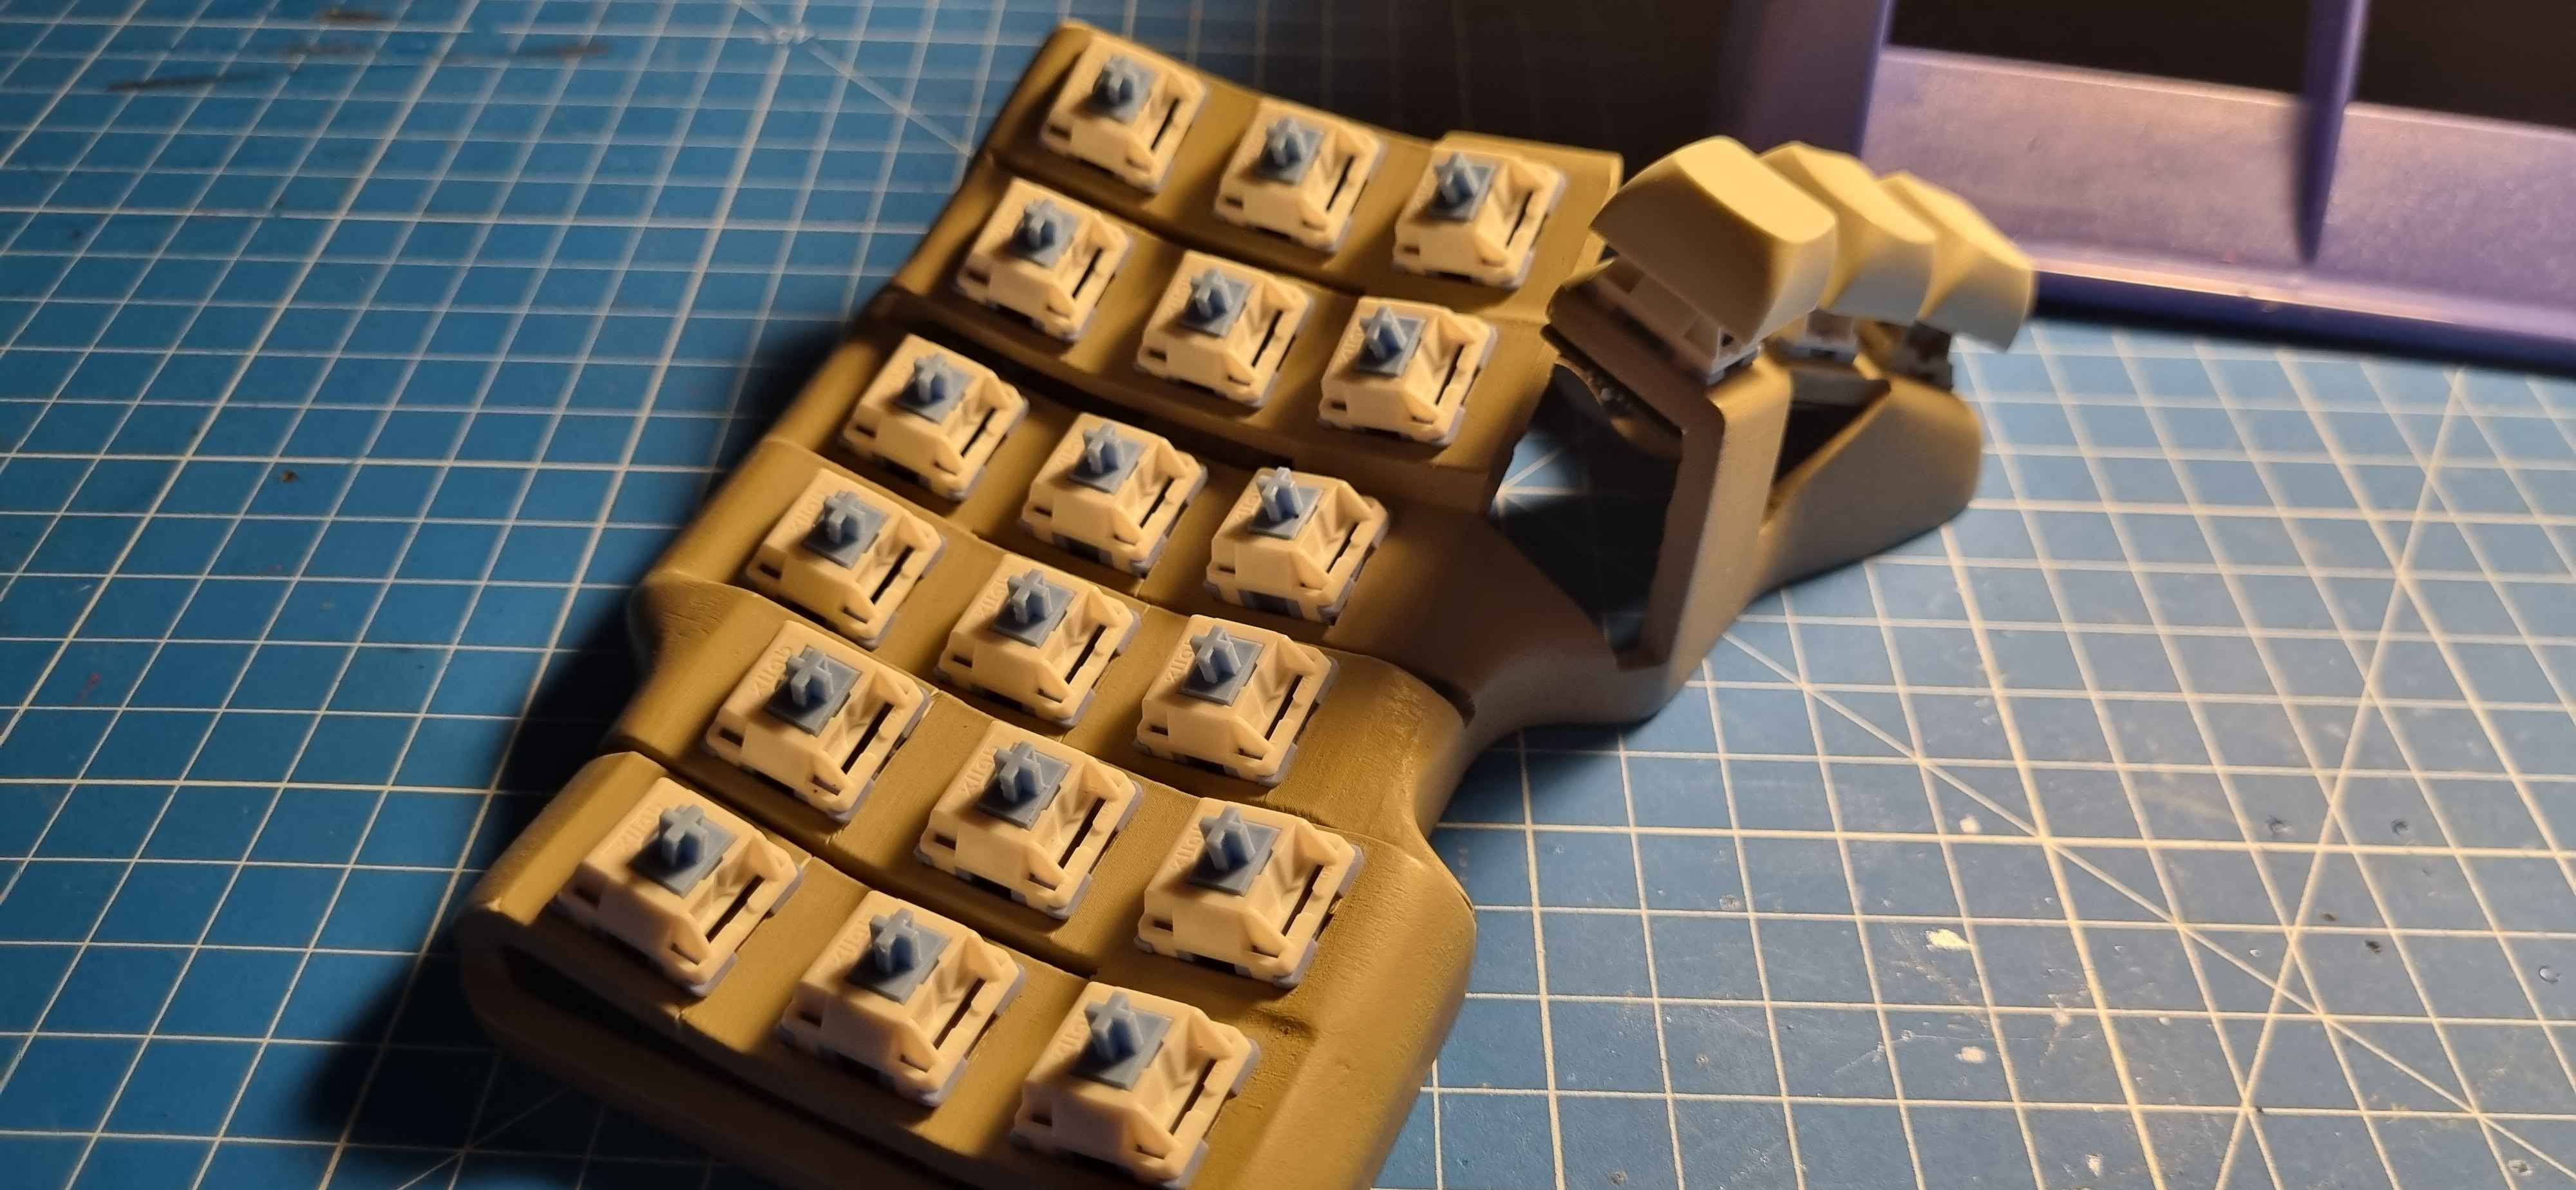
Charybdis wireless keyboard

Intro
Recently I switched over to use split keyboards and tried out the lily58 and cornekb v4. I’m really enjoying the split and ortholinear layout but I still feel like they are missing something. The layout is great but I think with the flat surface it’s a bit hard to reach out for the outer keys with my pinky. Also, I’m learning vim and discover how easy I can get in “the flow” with limited use of the mouse. So I set out to find a keyboard with sort of curved keywell and a trackball (I’m getting rid of the mouse), and I stumble on the Charybdis Keyboard.
This is my build blog for the charybdis mini keyboard, designed and created by BastardKeyboards and wireless version made possible by EIGA and VOIDed mods - https://www.youtube.com/watch?v=Mks7QDxFreY
Research
There are lots of information on building a wire version on BastardKeyboards page. They are actually very helpful, so I recommend have a read through even if you want to build the wireless version.
https://docs.bastardkb.com/bg_charybdis/01index.html
This is the only wireless build blog, that I can find on the net. Which is super helpful, it wouldn’t be able to complete this build without this blog. Huge thank to erenatas for putting it together!
https://github.com/erenatas/charybdis-wireless-3x6
Watching this nano build let me map out and understand all the steps that I need to do.
https://www.youtube.com/watch?v=0RGcVYeuxNM
Gathering parts
erenatas build guide listed out the parts for Europe region, so please follow his list if you’re in EU.
I’m in Australia so here’s my updated version of the parts that I got from Amazon, AliExpress and Keebd.
| Name | Count | Link |
|---|---|---|
| Trackball | 1 | Amazon AliExpress search is terrible. I’m sure there are trackballs available but I just can’t search for. |
| nice!nano microcontroller | 2 | Keebd |
| (optional) mill max sockets | 2 | Aliexpress |
| SOD123 Diodes | 41 | Aliexpress |
| Button, 4x4x1.5 | 2 | Aliexpress |
| PMW3610 module | 1 | Aliexpress |
| Mini Toggle Switch TS-6 SPDT | 2 | Aliexpress |
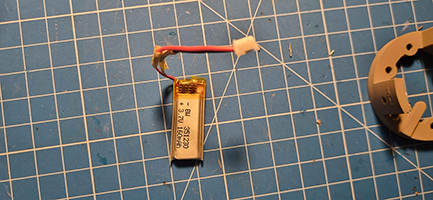
| Batteries | 2 | Keebd.This is me from the future, try search for one with a jst connector plug. (aliexpress should have them as well) |
| Ceramic Bearing Balls 2.5mm | 3 | Aliexpress |
| Flexstrip Jumper Cables | 2 | Aliexpress |
| Key Switches | 41 | I already have some hmx cloud switches available on hand. So I’m going to use them for this build. |
| M3 5mm Brass Melt Nuts | Aliexpress | |
| M4 5mm Brass Melt Nuts | Aliexpress | |
| M3 8mm Torx Screws | Aliexpress | |
| M4 8mm Torx Screws | Aliexpress | |
| JST plug 2-pin | 2 | Aliexpress |
| Hot swap socket | 82 | This is me from the future, do not try to hotswap the switches, it’s not possible. Trust me. |
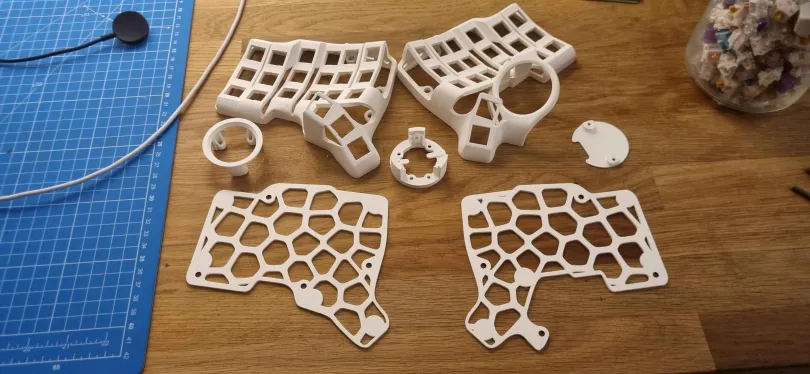
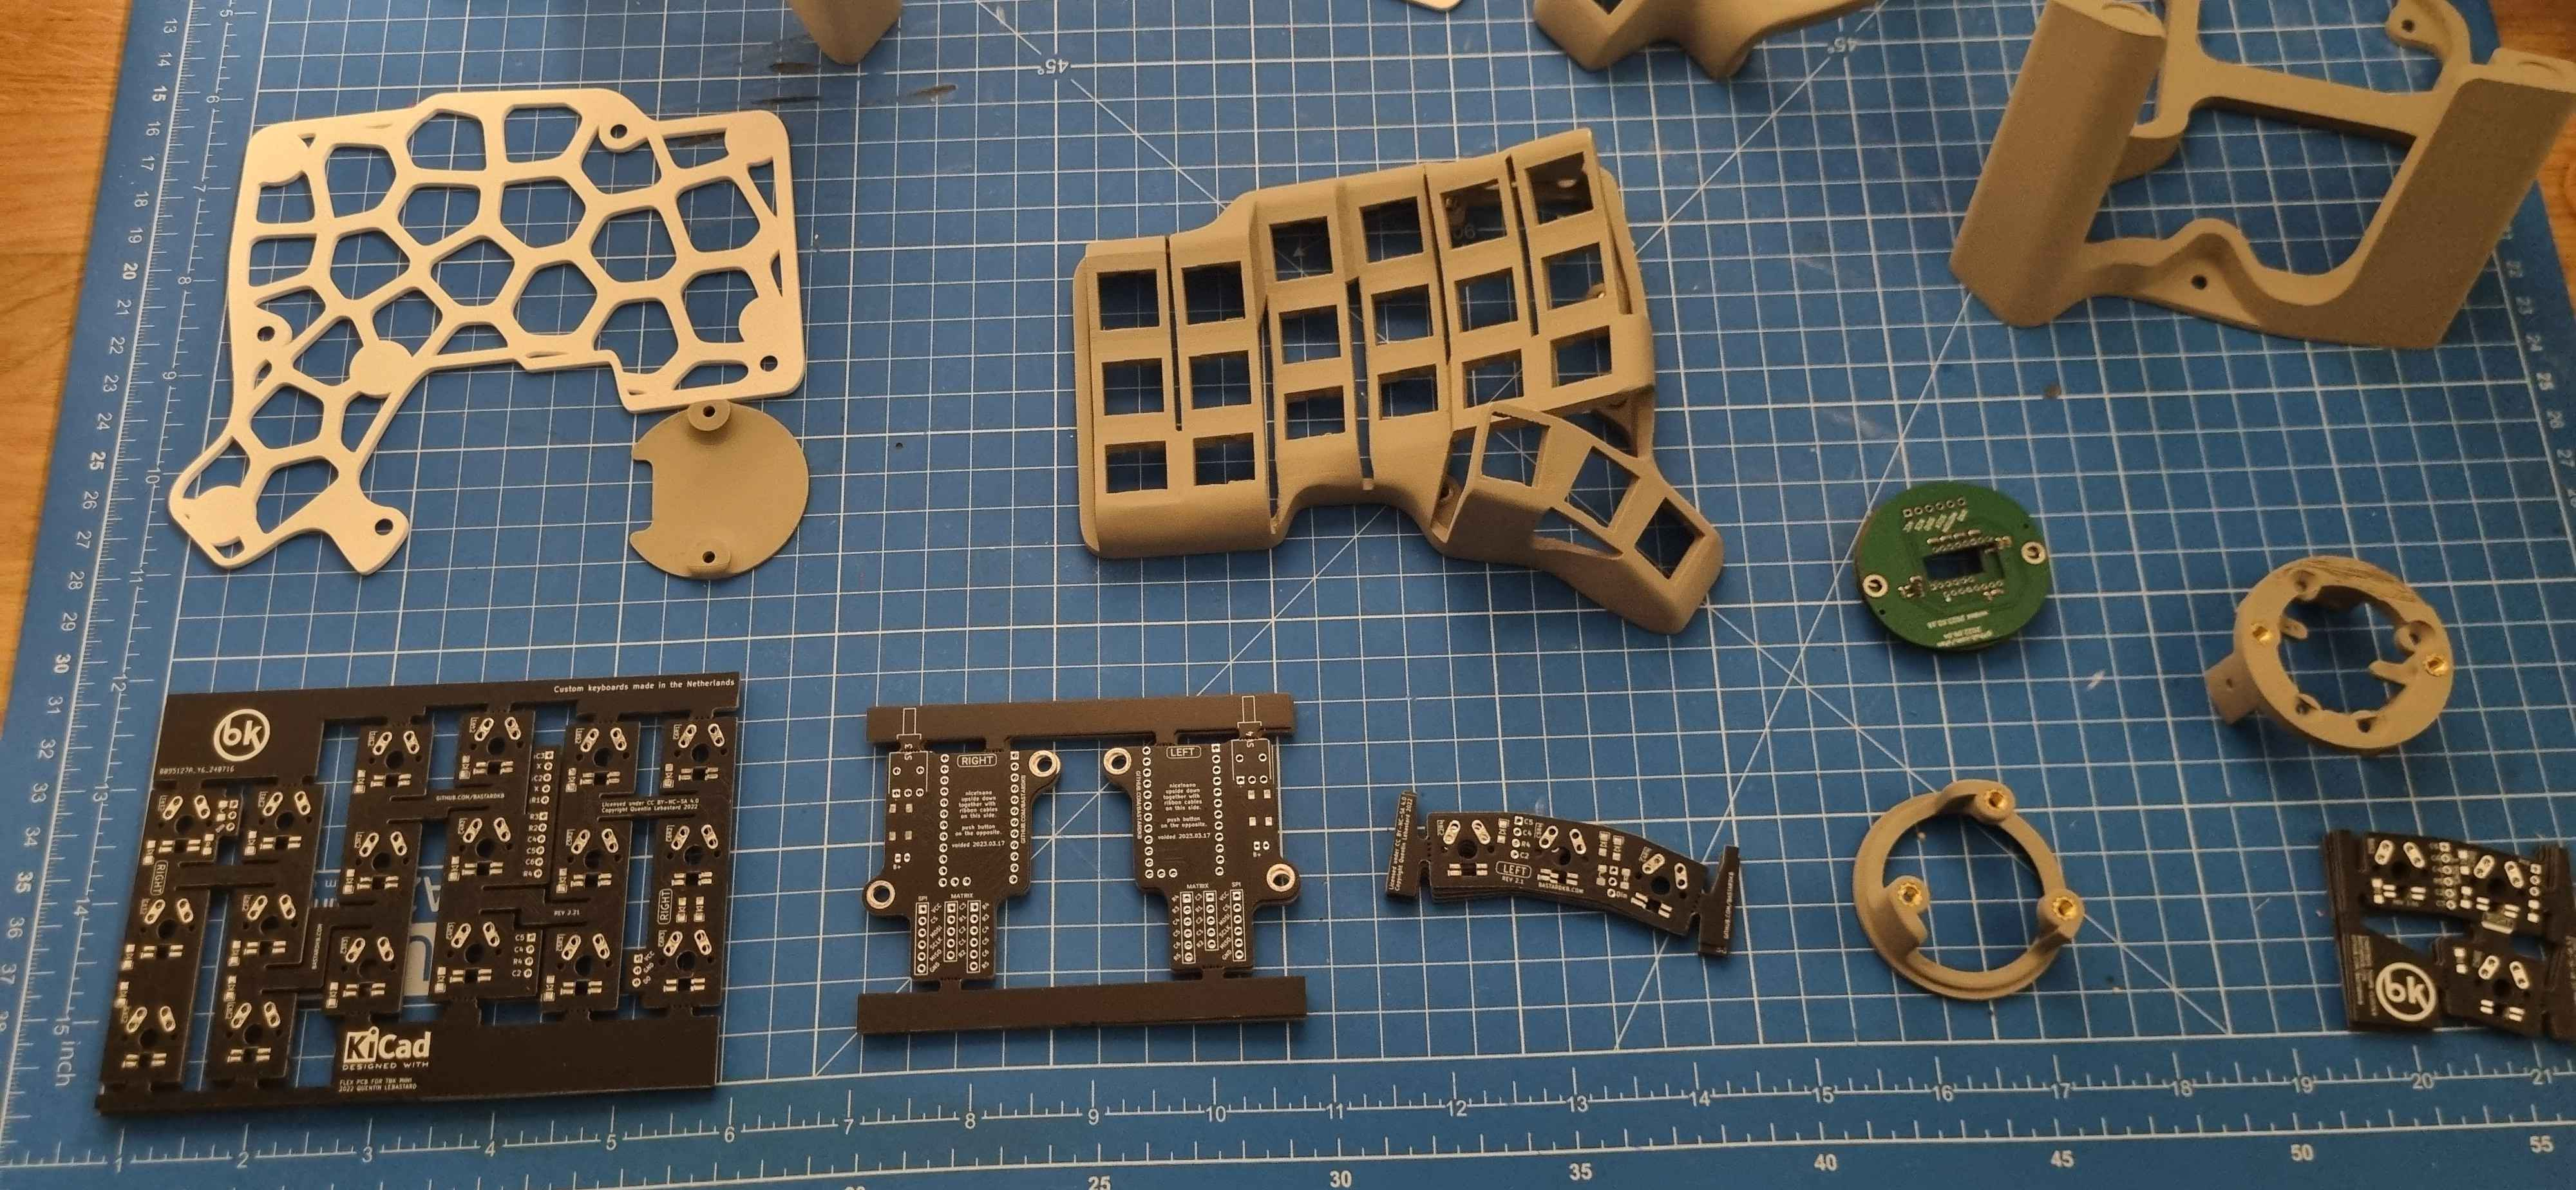
3D prints
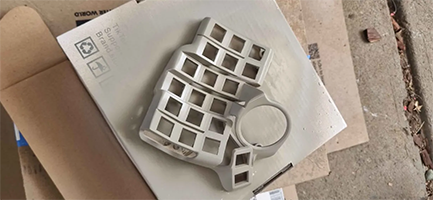
I got a 3d printer myself so it was straight forward to get the cases printed out. I’m still new with 3D printing, so the part came out not that great. However, they are not too bad after some sanding and painting.
3D models referencing from erenatas’ links


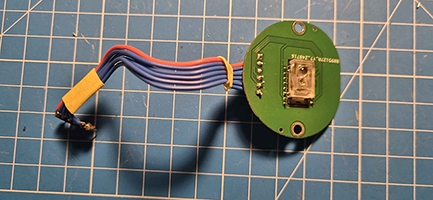
PCBs
Again I followed erenatas guide for this section and ordered the pcbs from JLCPCB.
Note: for the PMW3610 Breakout.
I had to update the bom file by remove the empty top and bottom row.
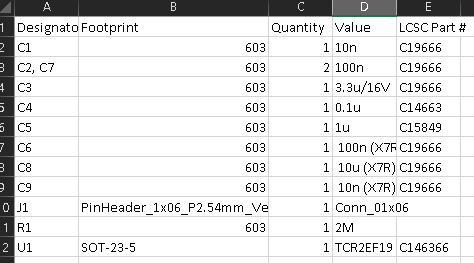
I too run into the same issue with TCR2EF19 shortage, so I had to ordered the TLV70018DDCR regulator.
and only the bottom side is required for assemble, the top bit I can solder the cables directly to the board.

Assembly
I’m not going to list out the steps, it’s already covered in the videos and erenatas’ guide. Instead I’ll list out the pain points/problems that I had to go through, so you don’t have to:
1 - Don’t force the pcb, if the switch feet can be soldered, then it’s good enough. I learnt the hard way after I broke a pcb in half.
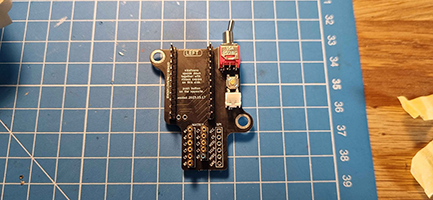
2 - This tool is necessary, if you only have one pair of hands.

3 - I couldn’t get hotswap done on the controller due to the headers that I got are too tall and it would not fit into the usb-c holes, so I ended up soldering the controllers to the nano holders. I don’t know if the low profile headers would fit, try out with your own risk.
4 - The case pocket space for the controller is smaller than I think it is. Be very gentle when fit in the flex strips, battery and power switches. Watch out where the flex strip cables come out of the pcb, I’ve broken 2 pcbs when I try to force the controller in (┬┬﹏┬┬). Also I had to solder the flex cables into the pcb, and only use the headers on the nano holder.
5 - If you’re planning to use the tent only version, solder the headers the other way, so you don’t have fit the flex cable into the pocket space. The cable would then hang below the cases.
6 - Remember to test out the pcb once you have solder all the diodes, flex cables and able connect to the nano holder.
7 - Do the right side first, as it’s the main board that talk back to the computer.
8 - When I finished both sides, they did not auto connect. To fix this issue I had to reset the boards by pressing both reset buttons at the same time.
9 - Test with the cable connected to the right board first. Make sure bluetooth is connected from the left board to the right board (with the usb cable connected from the right board to your pc). Once that tested then move on to test both boards with bluetooth connection to the pc.
10 - Issue ‘Paired but unable to connected to the pc | constantly connect then disconnect | And forget the connect but not able to re-pairing again.’ If you have these symptoms, map BT_CLR to a key to clear all the bluetooth profiles, or try to figure out where this key is mapped, then you should be able to pair again.
Here is my zmk repo that I forked from grassfedreeve
Be patient, don’t rush. I made this stupid mistake of rushing because of the excitement and broke 4 pcbs and a nano controller. Don’t be like me. It was painful waiting for the deliveries on the pcbs again.
I’ve learnt a lot working on this project and it’s really fun journey. I hope you are too, if you’ve decided to build one for yourself.
Here are some pictures of the boards.

Ps. Half of this blog was typed by this Charybdis keyboard ;)
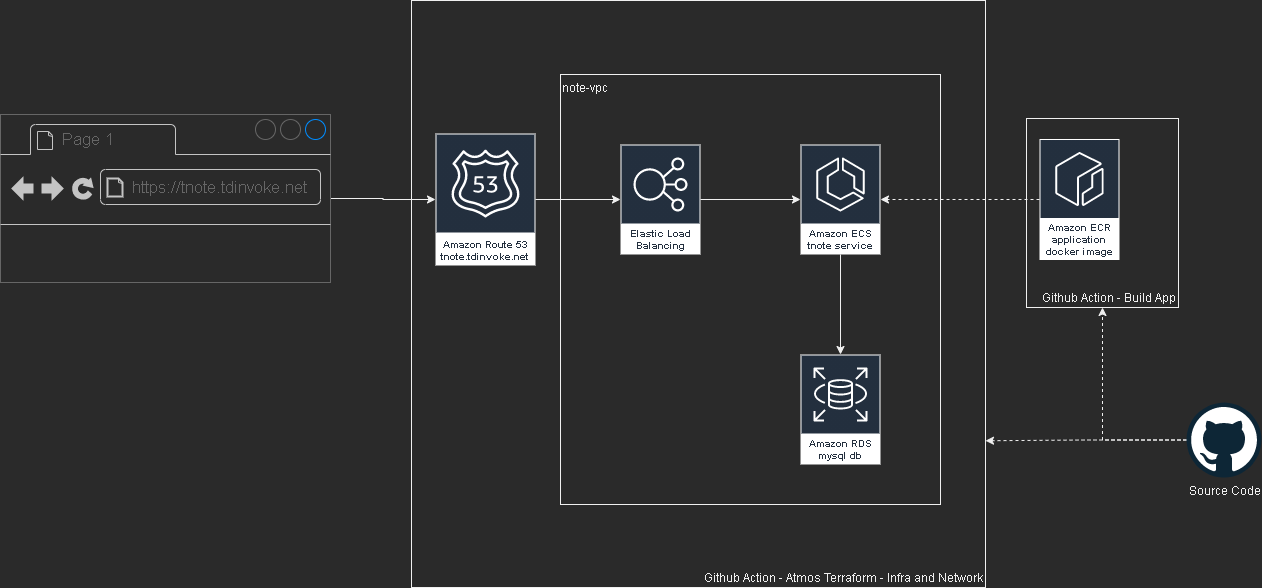
Flask Note app with aws, terraform and github action
This project is part of a mentoring program from my current work - Vanguard Au. Thanks Indika for the guidance and supports through this project.
Please test out the app here: https://tnote.tdinvoke.net
Flask note app
Source: https://github.com/tduong10101/tnote/tree/env/tnote-dev-apse2/website
Simple flask note application that let user sign-up/in, create/delete notes. Thanks to Tech With Tim for the tutorial.
Changes from the tutorial
Moved the db out to a mysql instance
Setup .env variables:
1 | from dotenv import load_dotenv |
connection string:
1 | url=f"mysql+pymysql://{SQL_USERNAME}:{SQL_PASSWORD}@{SQL_HOST}:{SQL_PORT}/{DB_NAME}" |
update create_db function as below:
1 | def create_db(url,app): |
Updated encryption method to use ‘scrypt’
1 | new_user=User(email=email,first_name=first_name,password=generate_password_hash(password1, method='scrypt')) |
Added Gunicorn Server
1 | /home/python/.local/bin/gunicorn -w 2 -b 0.0.0.0:80 "website:create_app()" |
Github Workflow configuration
Source: https://github.com/tduong10101/tnote/tree/env/tnote-dev-apse2/.github/workflows
Github - AWS OIDC configuration
Follow this doco to configure OIDC so Github action can access AWS resources.
app
Utilise aws-actions/amazon-ecr-login couple with OIDC AWS to configure docker registry.
1 | - name: Configure AWS credentials |
This action can only be triggered manually.
network
Source: https://github.com/tduong10101/tnote/blob/env/tnote-dev-apse2/.github/workflows/network.yml
This action cover aws network resource management for the app. It can be triggered manually, push and PR flow.
Here the trigger details:
| Action | Trigger |
|---|---|
| Atmos Terraform Plan | Manual, PR create |
| Atmos Terraform Apply | Manual, PR merge (Push) |
| Atmos Terraform Destroy | Manual |
Auto trigger only apply on branch with “env/*“
infra
Source: https://github.com/tduong10101/tnote/blob/env/tnote-dev-apse2/.github/workflows/infra.yml
This action for creating AWS ECS resources, dns record and rds mysql db.
| Action | Trigger |
|---|---|
| Atmos Terraform Plan | Manual, PR create |
| Atmos Terraform Apply | Manual |
| Atmos Terraform Destroy | Manual |
Terraform - Atmos
Atmos solve the missing param management piece over multi stacks for Terraform.
name_pattern is set with: {tenant}-{state}-{environment} example: tnote-dev-apse2
Source: https://github.com/tduong10101/tnote/tree/env/tnote-dev-apse2/atmos-tf
Structure:
1 | . |
Issue encoutnered
Avoid service start deadlock when start ecs service from UserData
Symptom: ecs service is in ‘inactive’ status and run service command stuck when manually run on the ec2 instance.
1 | sudo systemctl enable --now --no-block ecs.service |
Ensure rds and ecs are in same vpc
Remember to turn on ecs logging by adding the cloudwatch loggroup resource.
Error:
1 | pymysql.err.OperationalError: (2003, "Can't connect to MySQL server on 'terraform-20231118092121881600000001.czfqdh70wguv.ap-southeast-2.rds.amazonaws.com' (timed out)") |
Don’t declare db_name in rds resource block
This is due to the note app has a db/table create function, if the db_name is declared in terraform it would create an empty db without the required tables. Which would then resulting in app fail to run.
Load secrets into atmos terraform using github secret and TFVAR
Ensure sensitive is set to true for the secret. Use github secret and TF_VAR to load the secret into atmos terraform TF_VAR_secret_name={secrets.secret_name}
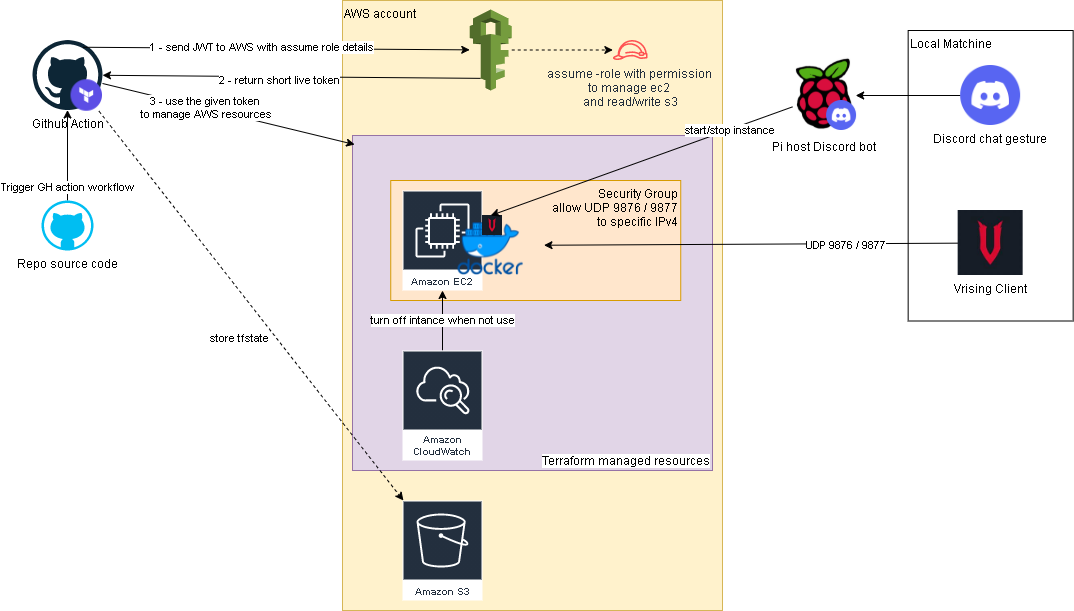
Terraform and Github actions for Vrising hosting on AWS
It’s been awhile since the last time I play Vrising, but I think this would be a good project for me to get my hands on setting up a CICD pipeline with terraform and github actions (an upgraded version from my AWS Vrising hosting solution).
There are a few changes to the original solution, first one is the use of vrising docker image (thanks to TrueOsiris), instead of manually install vrising server to the ec2 instance. Docker container would be started as part of the ec2 user data. Here’s the user data script.
The second change is terraform configurations turning all the manual setup processes into IaC. Note, on the ec2 instance resource, we have a ‘home_cdir_block’ variable, referencing an input from github actions secret. So then only the IPs in ‘home_cdir_block’ can connect to our server. Another layer of protection is the server’s password in user data script which also getting input from github secret variable.
Terraform resources would then get deploy out by github actions with OIDC configured to assume a role in AWS. The configuraiton process can be found here. The IAM role I set up for this project is attached with ‘AmazonEC2FullAccess’ and the below inline policy:
1 | { |
Oh I forgot to mention, we also need an S3 bucket create to store the tfstate file as stated in _provider.tf.
Below is an overview of the upgraded solution.
Github repo: https://github.com/tduong10101/Vrising-aws
Forza log streaming to Opensearch
In this project I attempted to get forza log display in ‘real time’ on AWS Opensearch (poorman splunk). Below is a quick overview of how to the log flow and access configurations.
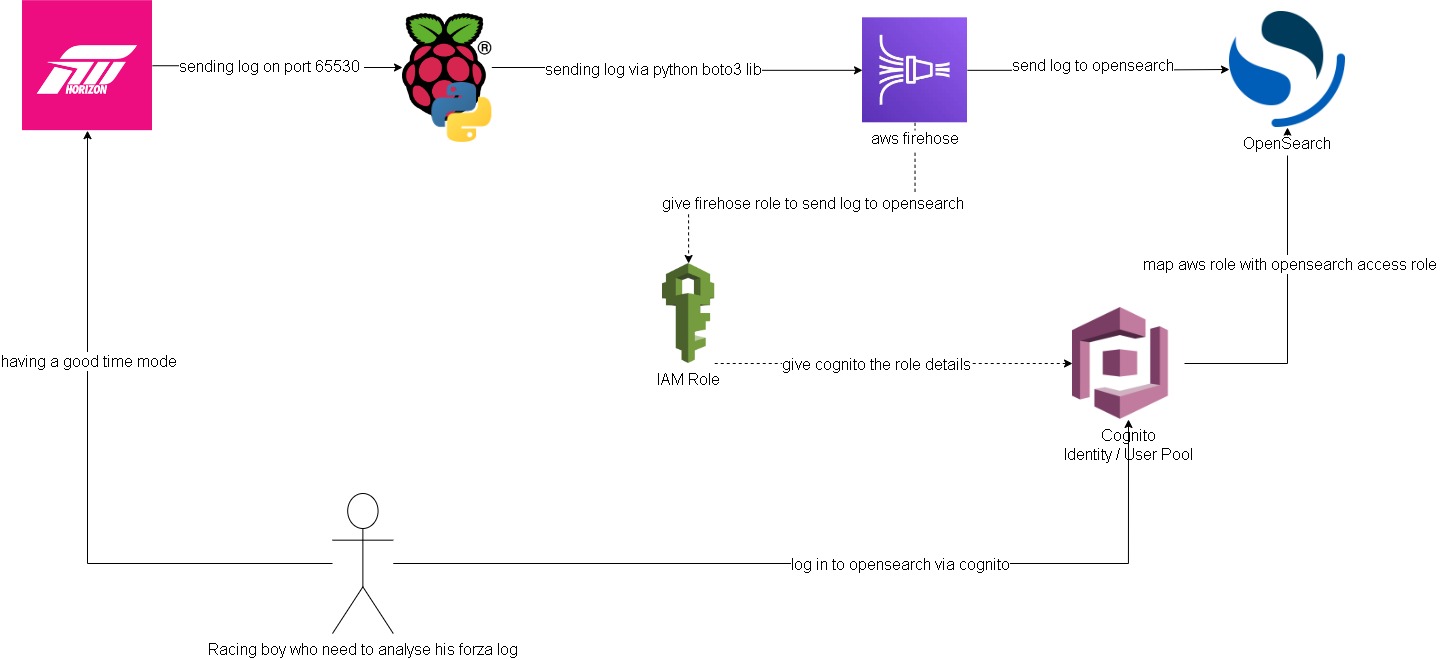
Forza -> Pi -> Firehose data stream:
Setting up log streaming from forza to raspberry pi is quite straight forward. I forked jasperan forza-horizon-5-telemetry-listener repo and updated it with a delay functionality and also a function to send the log to aws firehose data stream (forked repo). Then I just got the python script run while I’m playing on forza
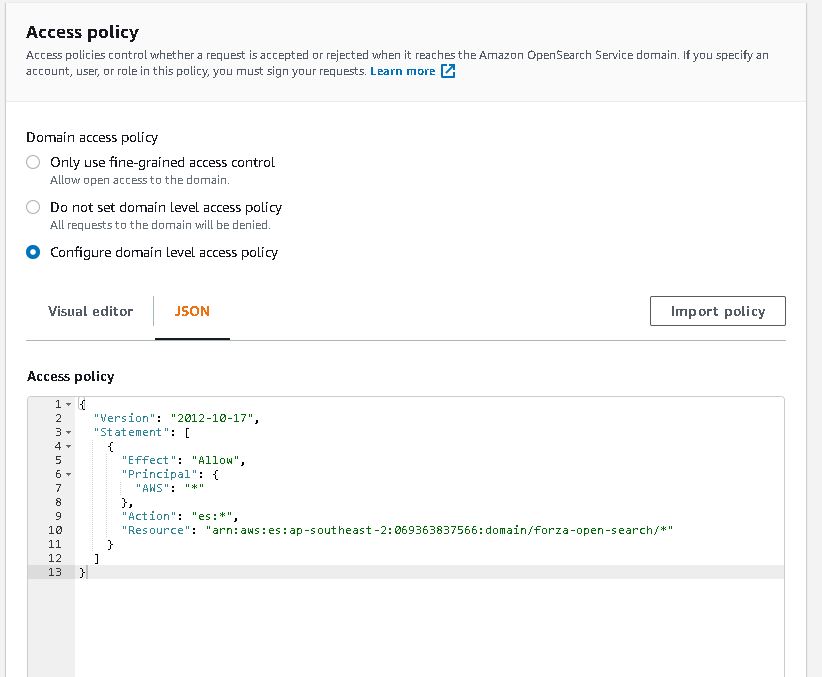
Opensearch/Cognito configuration:
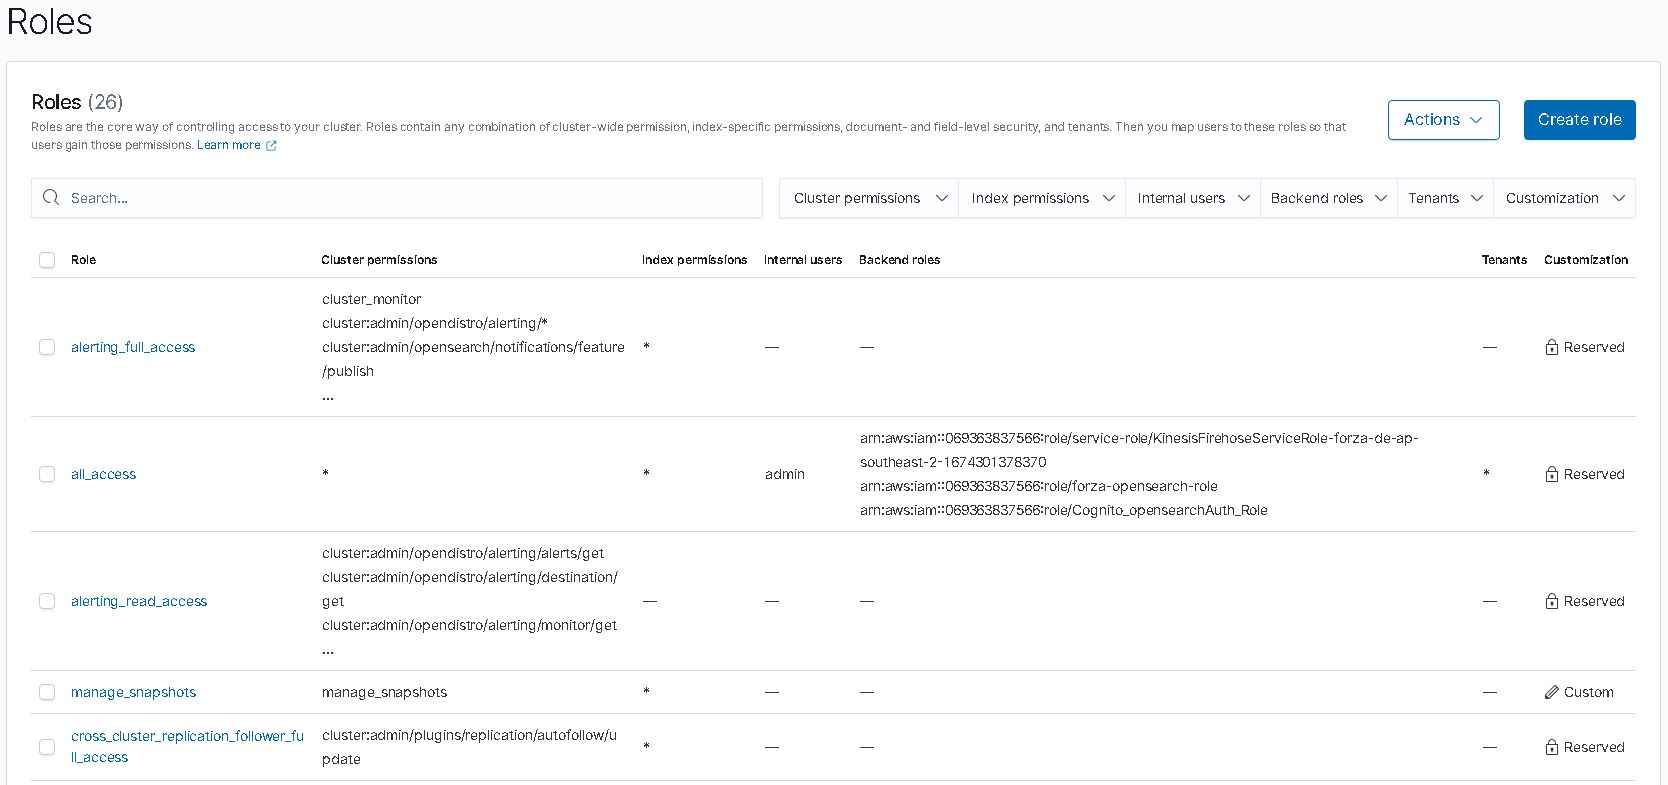
Ok this is the hard part. I spent most of the time on this. Firstly, to have firehose stream data into opensearch I need to somehow map the aws access roles to opensearch roles. ‘Fine grain access’ option will not work, we can either use SAML to hook up to an idp or use the inhouse aws cognito. Since I don’t have an existing idp, I had to setup cognito identity pool and user pool. From there I can then give the admin opensearch role to cognito authenticate role which assigned to a user pool group.
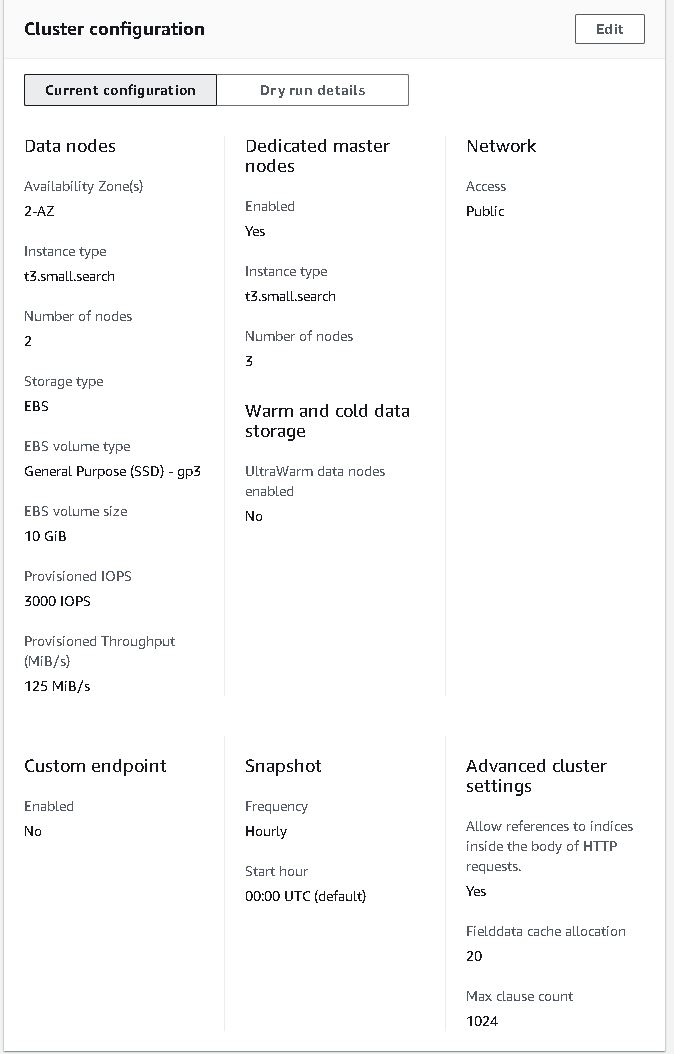
Below are some screenshots on opensearch cluster and cognito. Also thanks to Soumil Shah his video on setting up congito with opensearch helped alot. Here’s the link.
opensearch configure
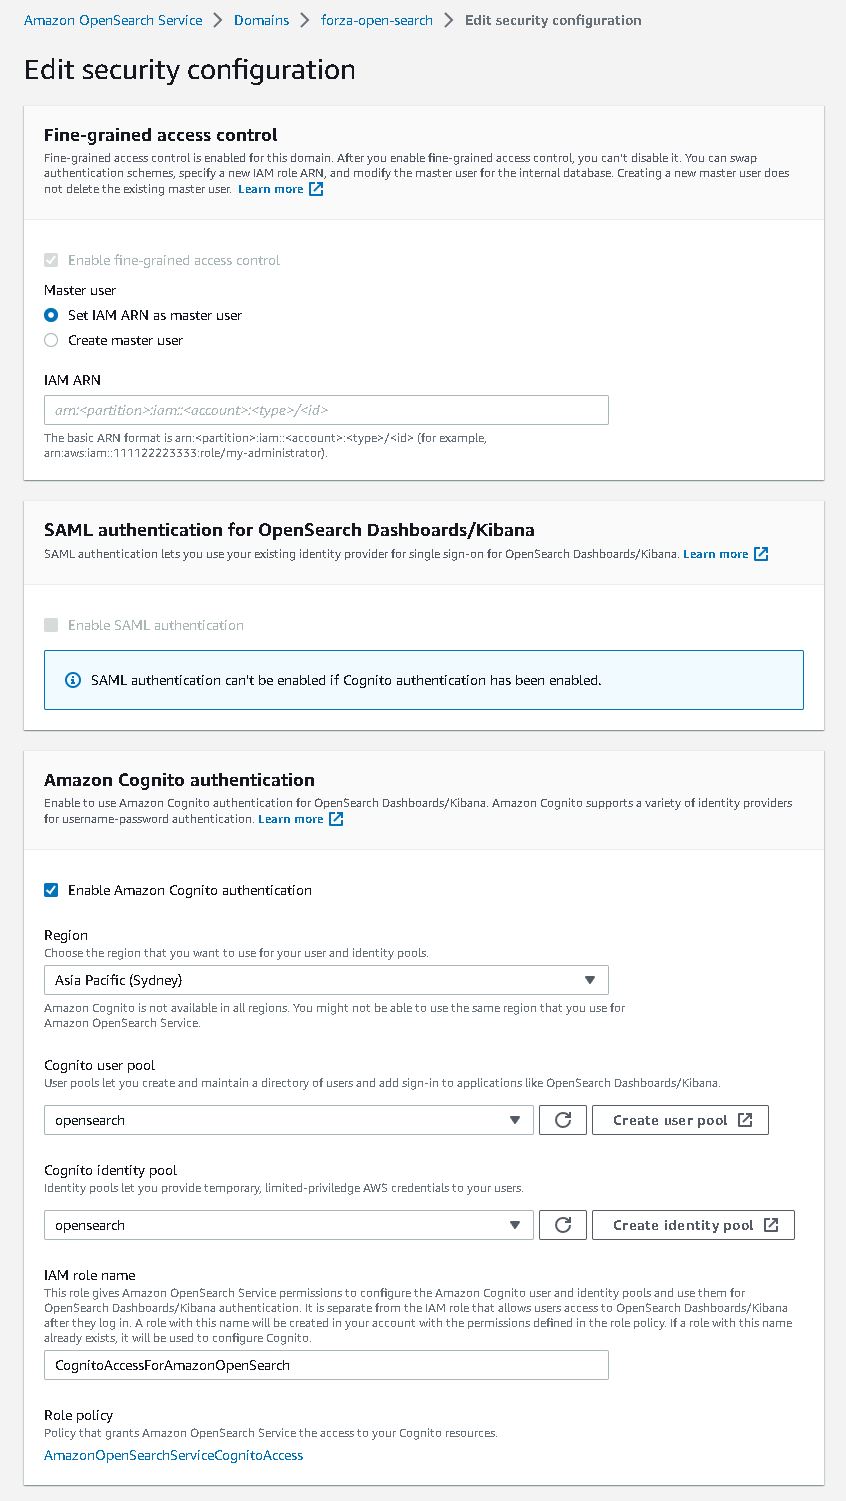
opensearch security configure
opensearch role
Note: all this can be by pass if I choose to send the log straight to opensearch via https rest. But then it would be too easy ;)
Note 2: I’ve gone with t3.small.search which is why I put real-time in quotation
Firehose data stream -> firehose delivery stream -> Opensearch:
Setting up delivery stream is not too hard. There’s a template for sending log to opensearch. Just remember to give it the right access role that.
Here is what it looks like on opensearch:
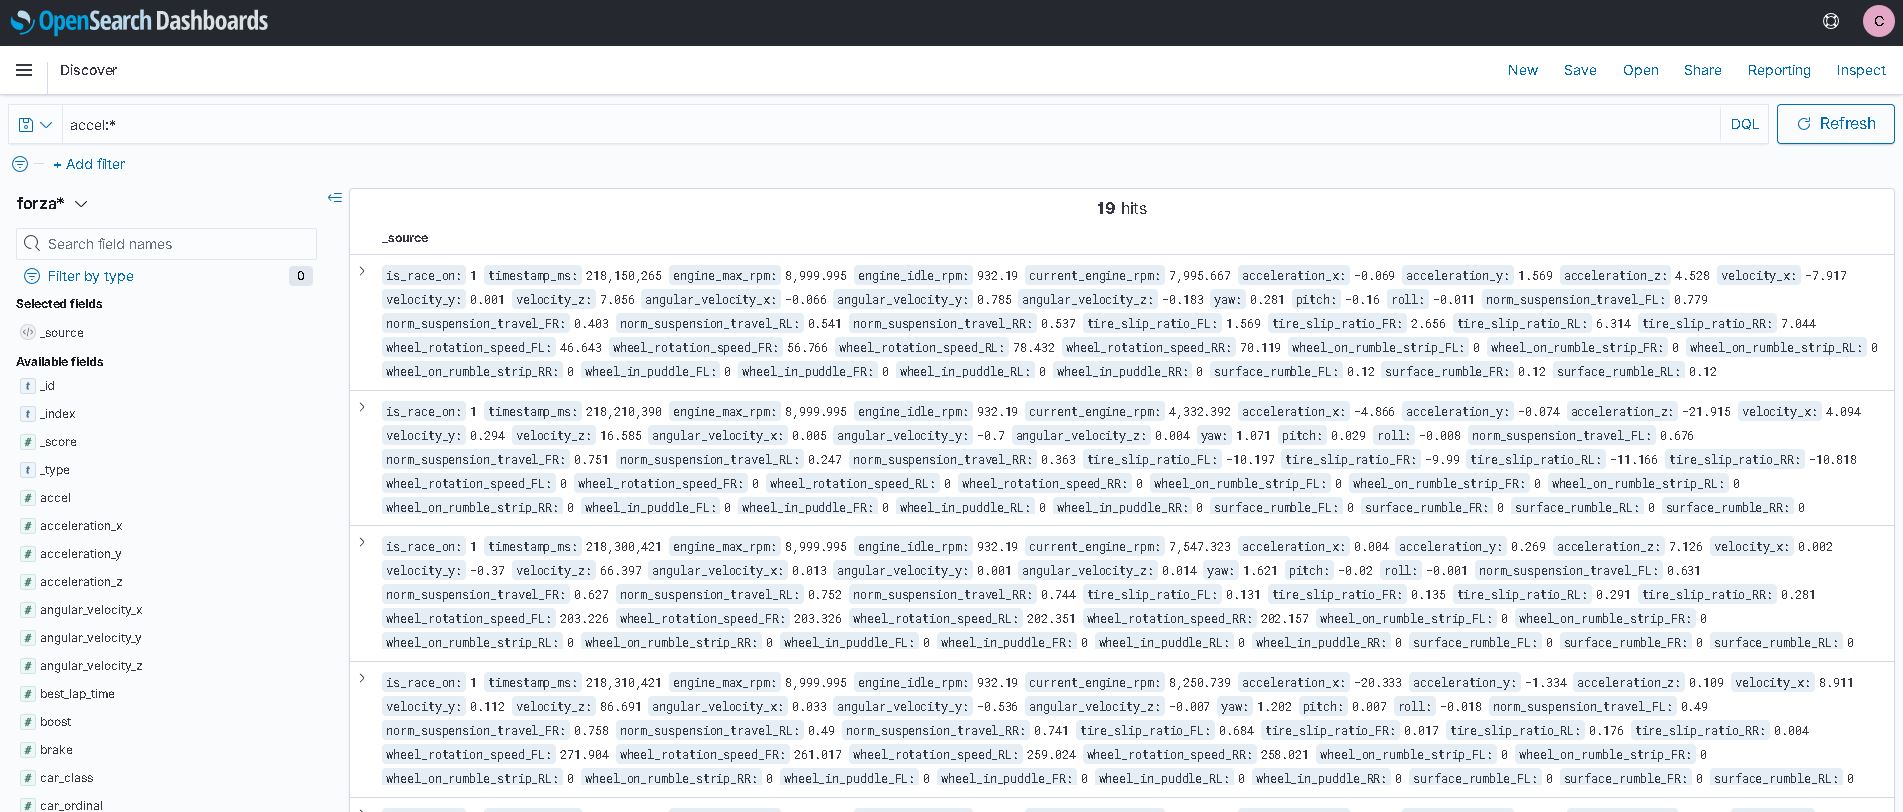

I’m too tired to build any dashboard for it. Also the timestamp from the log didn’t get transform into ‘date’ type, so I’ll need to look into it at another time.
Improvements:
- docker setup to run the python listener/log stream script
- maybe stream log straight to opensearch for real time log? I feel insecure sending username/password with the payload though.
- do this but with splunk? I’m sure the indexing performance would be much better. There’s arealdy an addon for forza on splunk, but it’s not available on splunk cloud. The addon is where I got the idea for this project.
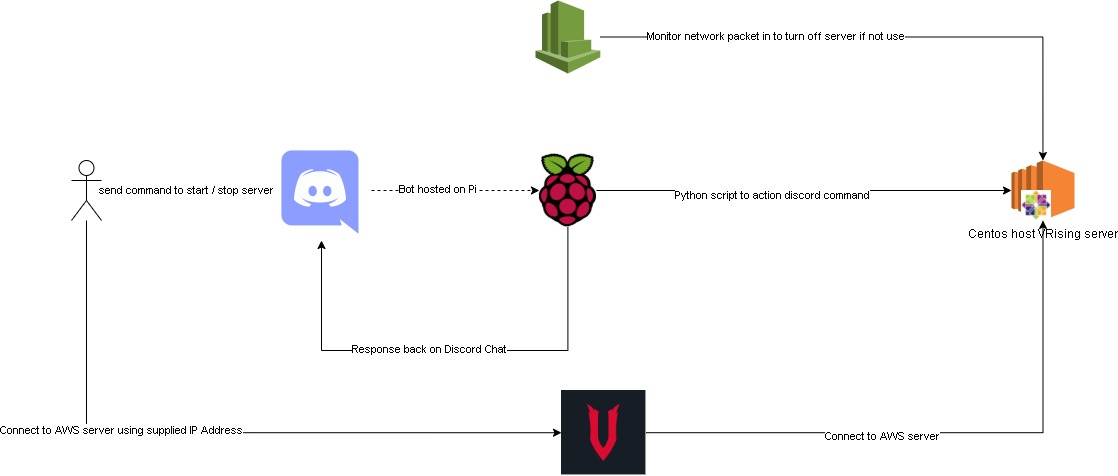
Hosting VRising on AWS
Quick Intro - “V Rising is a open-world survival game developed and published by Stunlock Studios that was released on May 17, 2022. Awaken as a vampire. Hunt for blood in nearby settlements to regain your strength and evade the scorching sun to survive. Raise your castle and thrive in an ever-changing open world full of mystery.” (vrising.fandom.com)
Hosting a dedicated server for this game is similar to how we set one up with Valheim (Hosting Valheim on AWS). We used the same server tier as Valheim, below are the details.
VRising Server does not officially available for Linux OS, luckily we found this guide for setting it up on Centos. Hence we used a centos AMI on “community AMIs”.
- AMI: ap-southeast-2 image for x86_64 CentOS_7
- instance-type: t3.medium
- vpc: we're using default vpc created by aws on our account.
- storage: 8gb.
- security group with the folowing rules:
- Custom UDP Rule: UDP 9876 open to our pc ips
- Custom UDP Rule: UDP 9877 open to our pc ips
- ssh: TCP 22 open to our pc ips
We are using the same cloudwatch alarm as Valheim to turn off the server when there’s no activity.
This time we also added a new feature, using discord bot chat to turn the aws server on/off.

This discord bot is hosted on one of our raspberry pi. Here is the bot repo and below is the flow chart of the whole setup.
Improvements:
Maybe cloudwatch alarm can be set with a lambda function. Which would send a notification to our discord channel letting us know that the server got turn off by cloudwatch.
We considered using Elastic IP so the server can retain its ip after it got turn off. But we decided not to, as we wanted to save some cost.
It has been awhile since we got together and work on something this fun. Hopefully, we’ll find more ideas and interesting projects to work together. Thanks for reading, so long until next time.
Spotify - Time machine

“Music is the closest thing we have to a time machine”
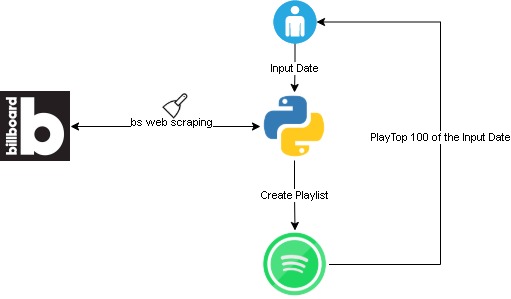
Want to go back in time and listen to popular songs of that time? With a bit of web scraping, it is possible search/create a playlist of top songs in spotify with any given date in the last 20 years.
Where does the idea come from?
This is one of the projects in the 100 days of python challenge - here is the link.
How does it work?
This script would scrap for top 100 billboard songs on user’s input date. Then it would create a spotify playlist with following title format “hot-100-
To set it up please follow “getting started” in this git repo. Here is an overview flow:
Challenges
The spotify api authenticate integration is complex and hard to get my head around. I ended up using spotipy python module instead of directly request to spotify api.
Took me a bit of time to figure out the billboard site structure. Overall not too bad, I cheated a bit and checked the solution. However, this is my own code version.
Duplicate playlist! Not sure if this is a bug, but playlist created by the script will not show in user_playlists(). So if a date is re-input, a duplicate playlist will get created.
Hosting Valheim on AWS

Quick introduction for Valheim, it’s an indi game developed by IronGate which is a viking survival game where player can build/craft like minecraft, fight like darksoul and explore a beautiful world like zelda. The game is a huge success with 5 milion players, more information can be found here at Valheim official site.
Below are the steps I took to setup a dedicated server on aws to host valheim:
Spin up an ec2 instance: The game ran pretty smooth with a tiny bit of latency. Below is the instance details:
- AMI: Ubuntu Server 20.04 LTS (HVM)
- instance-type: t3a.medium. This is the cheapest we can get. Unfortunately valheim does not support 64bit(Arm) so we can’t use t4 instance type.
- vpc: we’re using default vpc created by aws on our account.
- storage: 8gb, the game only require less than 2gb.
- security group with the folowing rules:
- Custom TCP Rule: TCP 2456 - 2458 open to our pc ips
- Custom UDP Rule: UDP 2456 - 2458 open to our pc ips
- ssh: TCP 22 open to our pc ips
Install Valheim server follow this git repo created by Nimdy: Dedicated_Valheim_Server_Script
Setup cloudwatch to monitor “Network packet out(count)” to stop the instance when it’s not in use after 25 minutes. Valheim server save the world every 20 minutes, this ensure we have the game save whenever we log off:
- Threshold type: statics
- Whenever NetworkPacketsOut is: Lower/Equal <= threshold
- than: 250
- period: 5 minutes
- Datapoint to alarm: 5 out of 5
- treat missing data as missing
Optional: Migrate exisiting world on local computer to valheim server. Coppy the following to files from the below source to valheim server world location: .fwl, .fwl.old, .db. I’m using FileZilla to transfer the file to the ec2 instance.
- source: C:\Users\YOURNAME\AppData\LocalLow\IronGate\Valheim\worlds
- valheim server world location: /home/steam/.config/unity3d/IronGate/Valheim/worlds
Run the below script to start the instance and game. (aws powershell module is requrired on the local computer)
1
2
3
4
5
6
7
8
9
10
11
12
13
14
15
16
17
18
19
20
21
22
23
24
25
26
27
28Import-Module AWS.Tools.EC2
$steam_exe = <steam_exe_location>
$instance_id = <ec2_valheim_instance_id>
Set-DefaultAWSRegion -Region <ec2_valheim_instance_region>
$instance_status = Get-EC2InstanceStatus -InstanceId $instance_id
if ($instance_status -eq $null){
Start-EC2Instance -InstanceId $instance_id
do {
$instance = (Get-EC2Instance -InstanceId $instance_id).Instances
Start-Sleep -Seconds 10
} while ($instance.PublicIpAddress -eq $null)
} else {
$instance = (Get-EC2Instance -InstanceId $instance_id).Instances
}
$server_ip = $instance.PublicIpAddress
while ($instance_status.Status.status -ne "ok"){
Start-Sleep -Seconds 10
$instance_status = Get-EC2InstanceStatus -InstanceId $instance_id
$instance_status.Status.status
}
if ($instance_status.Status.status -eq "ok"){
& $steam_exe -applaunch 892970 +connect ${server_ip}:2456
}
We got this setup running fine for the last 2-3 weeks, and it’s costing us around $1.8 usd. Pretty happy with it, next improvement I guess maybe put together a Terraform for this or if possible, have cloudwatch monitor valheim’s log instead of network packet out count.
Terraform-AWS serverless blog
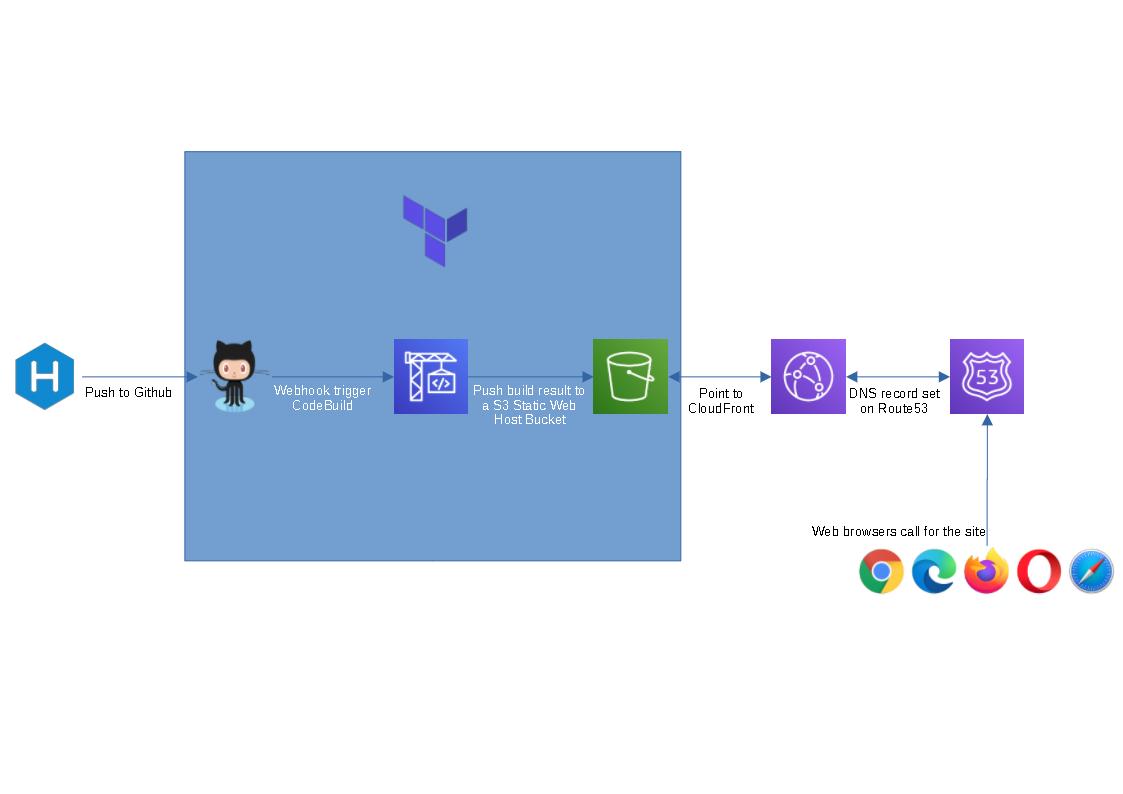
I’m learning Terraform at the moment and thought this could be a good hand-on side project for me. The provided terraform code will spin up a github repo, a codebuild project and a s3 bucket to host a static blog (blue box in the flow chart above). I figure people might not want to use cloudfront or route 53 as they are not free tier service, so I left them out.
To spin this up, we will need the below prerequisites:
Once all the prerequisites are setup, follow the steps below.
- Open cmd/powershell and run the following commands to clone terraform and build spec file:
1 | git clone https://github.com/tduong10101/serverless-blog-terra.git |
- Update serverless-blog-terra/variable.tfvars with your github token and site name that you would like set up
- Run the following commands
1 | cd serverless-blog-terra |
- Review the resouces and put in “yes” to approve terraform to spin them up.
- Grab the outputs and save them somewhere, we’ll use them for later steps.
- Navigate to the parent folder of serverless-blog-terra
1 | cd .. |
Create a new folder, give it the same name as git repo (doesn’t matter if the is not the same, it’s just easier to manage), cd to new folder and run hexo init command
1
2
3mkdir <new folder>
cd .\<new folder>
hexo initCopy buildspec.yml file from serverless-blog-terra folder to this new folder
Update the buildspec.yml with s3:// link from step 5
Init Git and setup git remote with the below commands. Insert your git repo url from step 5.
1 | git init |
- Wait for codebuild to complete update S3 bucket. Logon to AWS console to confirm.

- Open the website_endpoint url on step 5 and enjoy your serverless blog.
Visit Hexo for instructions on how to create posts, change theme, add plugins etc
Remove the blog:
- If you don’t like the new blog and want to clean up aws/git resources. Run the below command:
1 | terraform destroy -var-file variable.tfvars |
- Once terraform finish cleaning up the resources. The rest of the folders can be removed from local computer.
Powershell Password Encryption and Decryption
Encrypte and Decrypt credential:
1 | #Create encrypt key |
Encrypt and Decrypt password:
1 | $Password = "Password123" |