
serverless
Terraform-AWS serverless blog
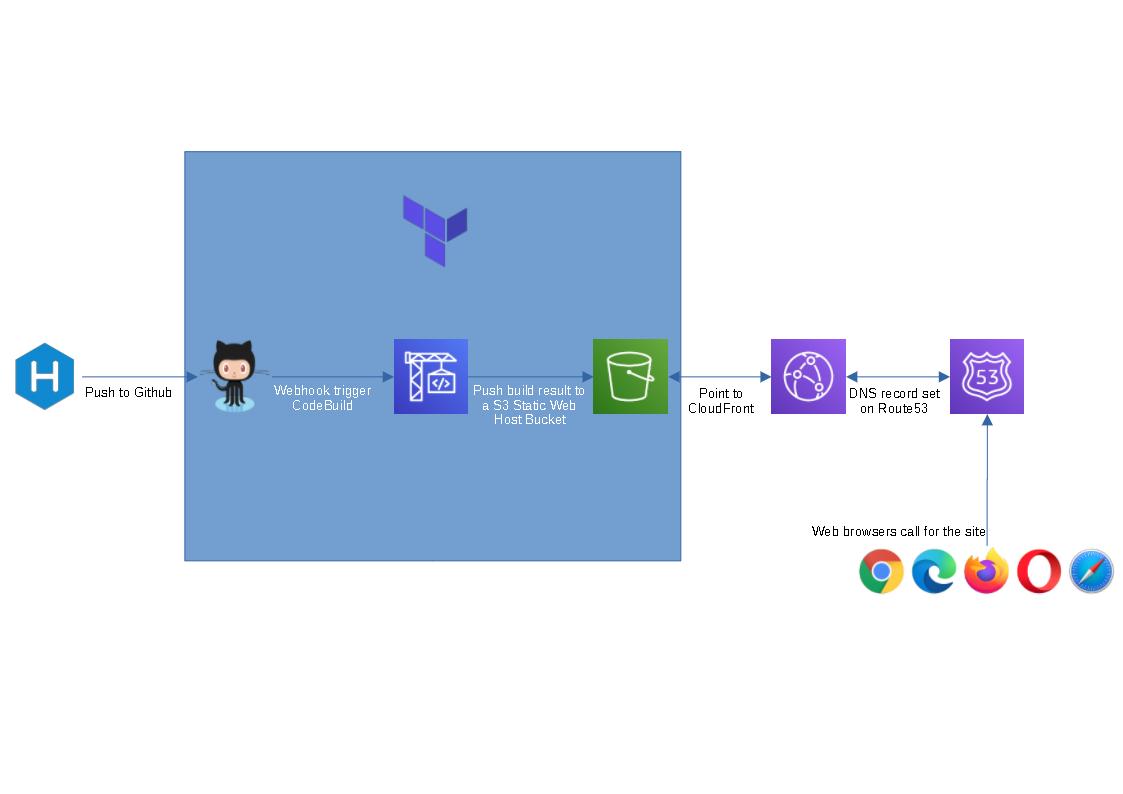
I’m learning Terraform at the moment and thought this could be a good hand-on side project for me. The provided terraform code will spin up a github repo, a codebuild project and a s3 bucket to host a static blog (blue box in the flow chart above). I figure people might not want to use cloudfront or route 53 as they are not free tier service, so I left them out.
To spin this up, we will need the below prerequisites:
Once all the prerequisites are setup, follow the steps below.
- Open cmd/powershell and run the following commands to clone terraform and build spec file:
1 | git clone https://github.com/tduong10101/serverless-blog-terra.git |
- Update serverless-blog-terra/variable.tfvars with your github token and site name that you would like set up
- Run the following commands
1 | cd serverless-blog-terra |
- Review the resouces and put in “yes” to approve terraform to spin them up.
- Grab the outputs and save them somewhere, we’ll use them for later steps.
- Navigate to the parent folder of serverless-blog-terra
1 | cd .. |
Create a new folder, give it the same name as git repo (doesn’t matter if the is not the same, it’s just easier to manage), cd to new folder and run hexo init command
1
2
3mkdir <new folder>
cd .\<new folder>
hexo initCopy buildspec.yml file from serverless-blog-terra folder to this new folder
Update the buildspec.yml with s3:// link from step 5
Init Git and setup git remote with the below commands. Insert your git repo url from step 5.
1 | git init |
- Wait for codebuild to complete update S3 bucket. Logon to AWS console to confirm.

- Open the website_endpoint url on step 5 and enjoy your serverless blog.
Visit Hexo for instructions on how to create posts, change theme, add plugins etc
Remove the blog:
- If you don’t like the new blog and want to clean up aws/git resources. Run the below command:
1 | terraform destroy -var-file variable.tfvars |
- Once terraform finish cleaning up the resources. The rest of the folders can be removed from local computer.
Hosting a simple Code Editor on S3
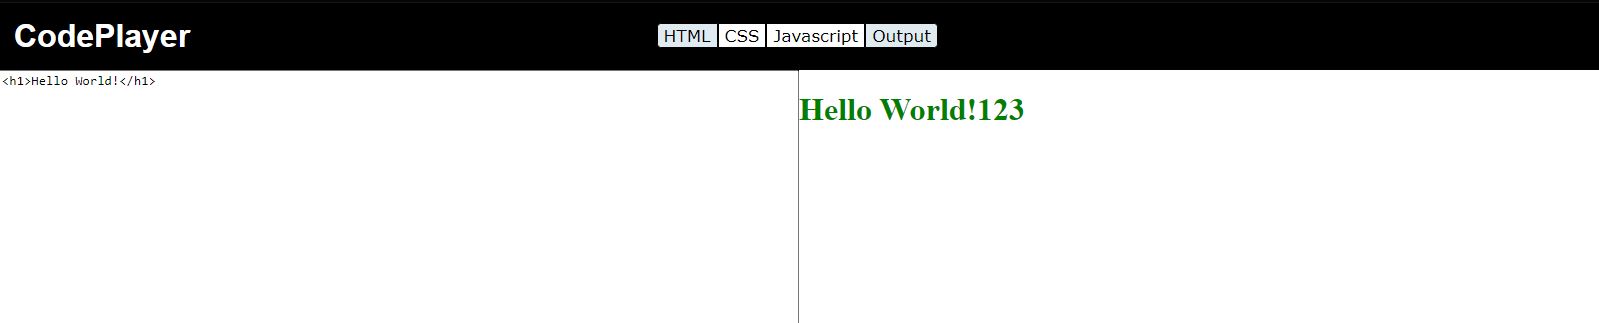
I got this old code editor project sitting in github without much description - repo link. So I thought why not try to host it on S3 so I could showcase it in the repo.
Also it’s a good pratice to brush up my knowledge on some of the AWS services (S3, CloudFront, Route53). After almost an hour, I got the site up so it’s not too bad. Below are the steps that I took.
Create a S3 bucket and upload my code to this new bucket - ceditor.tdinvoke.net.
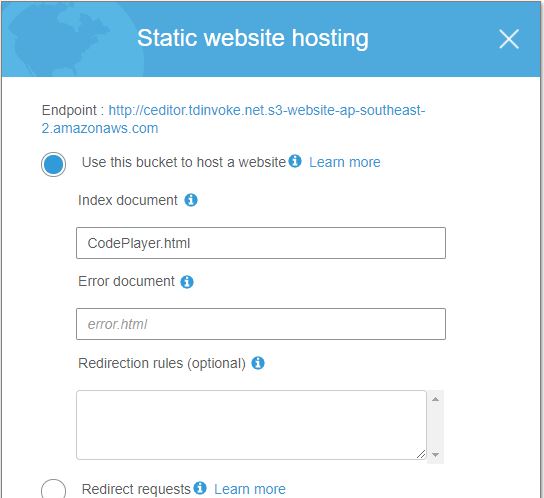
Enable “Static website hosting” on the bucket
Create a web CloudFront without following settings (the rest are set with default)
- Origin Domain Name: endpoint url in S3 ceditor.tdinvoke.net ‘Static Website Hosting’
- Alternate Domain Names (CNAMEs): codeplayer.tdinvoke.net
- Viewer Protocol Policy: Redirect HTTP to HTTPS
- SSL Certificate: Custom SSL Certificate - reference my existing SSL certificate
Create new A record in Route 53 and point it to the new CloudFront Distributions
Aaand here is the site: https://codeplayer.tdinvoke.net/
Next I need to go back to the repo and write up a readme.md for it.
Get AWS IAM credentials report script
Quick powershell script to generate and save AWS IAM credentials report to csv format on a local location.
1 | Import-Module AWSPowerShell |
My random podcast app

I’ve been trying to catch up with a few podcasts and can’t decide what to listen to first. So I thought, let create an app that could pick out a random episode for me. Less thinking about picking and more time listening!
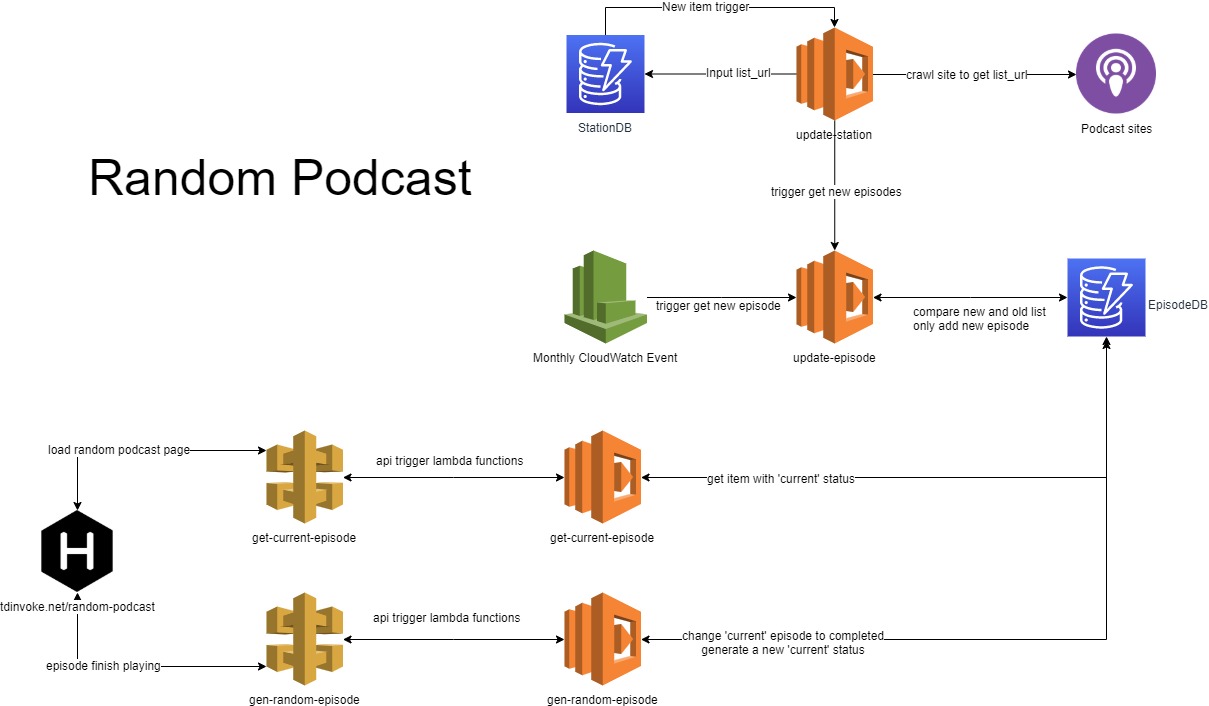
So here is what I came up with.
I thought it would be straight forward but it took me the whole weekend to get it up T__T
There are 4 lambda functions in this app.
1- update-station: trigger whenever a new item is added to stationsDB. This will crawl the site main page to get episode playlist and insert that back to stationsDB as list_url
2- update-episode: trigger by update-station function or a monthly cloudwatch event. This function will loop through the stationsdb and run the item’s spider fucntion on its list_url. The output would be a list of 50 most recent episodes for each stations. This list would then get compare with all episodes added to episodesDB. The differences would then get added to episodesDB
3- gen-random-episode: trigger by api gateway when an episode is finished playing at https://blog.tdinvoke.net/random-podcast/. This funciton would first change the current episode status ‘completed’. Then it would pull out all episodes url from episodeDB that haven’t play (with blank status). Random pick out 1 episode and change its status to current.
4- get-current-episode: trigger by api gateway when the page https://blog.tdinvoke.net/random-podcast/ is loaded. This one is simple, pull episode with ‘current’ status.
You can find the codes here
To see the app in action, please visit here
Issues encountered/thoughts:
- Add a UI page to modify the station DB. I’ll have to workout how to put authorisation in API call to add new station.
- Split crawler functions into separate lambda functions which make the functions clean and easy to manage.
- Add more crawler.At the moment, this app only crawl playerfm stations.
- Learnt how to add js scripts to Hexo. There arn’t much information on how to it out there. I had to hack around for awhile. Basically, I need to create a new script folder at thems/‘my-theme’/source/‘td-podcast’. Chuck all my js scripts in there, then modify ‘_partials/scripts.ejs’ to reference the source folder. Learnt a bit of ejs as well.
- Chalice doesn’t have Dynamodb stream trigger, gave up halfway and gone back to create the lambda functions manually.
- Looking into SAM and CloudFormation to do CI/CD on this.
- Could turn this into youtube/twitch random video. Looking into Youtube Google api and Twitch api.
AWS WAF automations
A friend of mine suggested that I should write something about AWS WAF security automations. This is mentioned in the Use AWS WAF to Mitigate OWASP’s Top 10 Web Application Vulnerabilities whitepaper and there are plenty of materials about this solution on the net. So I thought, instead of writing about what it is / how to set it up, let have some funs ddos my own site and actually see how it works.
I’m going to try to break my site with 3 different methods.
1. http flood attack
My weapon of choice is PyFlooder.
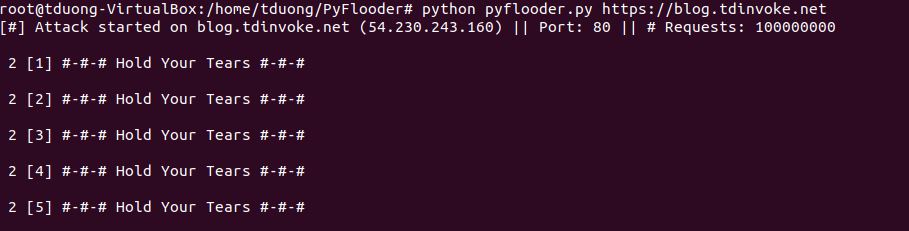
After about 5000 requests, the lambda function started to kick in and blocked my access to the side. I can also see my ip has been blocked on WAF http flood rule.

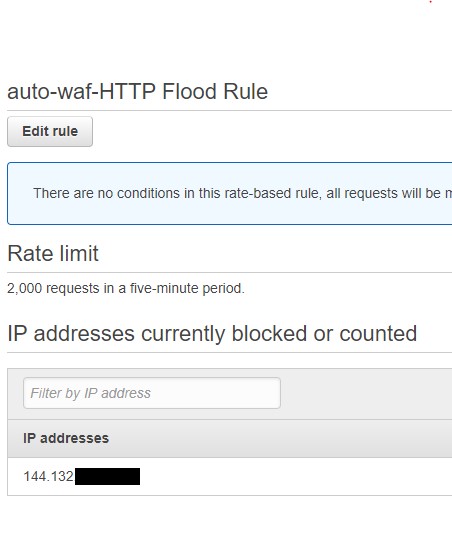
I then removed the ip from the blocked list and onto the next attack.
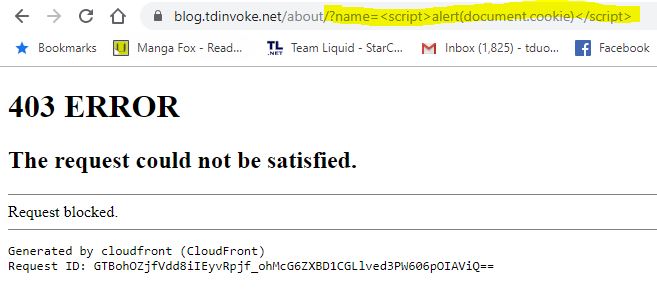
2. XSS
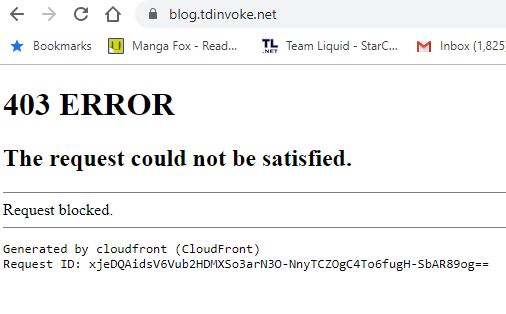
Next up is XSS, input a simple <script> tag on to the uri and I got 403 error straight away.
3. Badbot
For this method I used scrapy. Wrote a short spider script to crawl my site, targeting the honeypot url.
1 | import scrapy |
Release the spider!!!!

and got the 403 error as expected.
Issues encountered/thoughts:
Setting up the bot wasn’t easy as I expected, but I learnt a lot about scrapy.
I accidentally/unknowingly deleted the badbot ip list from the badbot rule. Only found out about the silly mistake by going through the whole pipeline (api gateway -> lambda -> waf ip list -> waf rule) to troubleshoot the issue.
PyFlooder is not compatible with windows os. Had to spin up a ubuntu vm to run it.
Learnt how to add file to source for Hexo. Not complicated at all, just chuck the file into /source folder. Do not use the hexo-generator-robotstxt plugin, I almost broken my site because of it.
Overall this was an interesting exercise - breaking is always more fun than building!
TI9 - Follow my fav team with opendota api, lambda and sns

It’s Dota season of the year, The International 9, the biggest esport event on the planet. So I thought I should make a project relate to this event - a notification function that notify me on my favorite team matches.
This function uses opendota api, aws lambda, cloudwatch and sns. Below is a high level design of the function I put together:
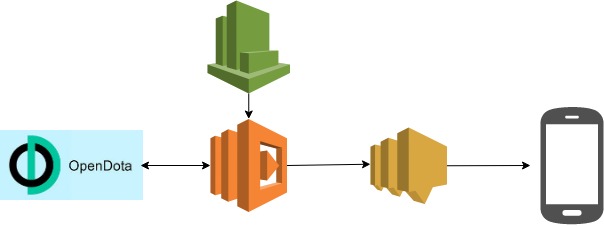
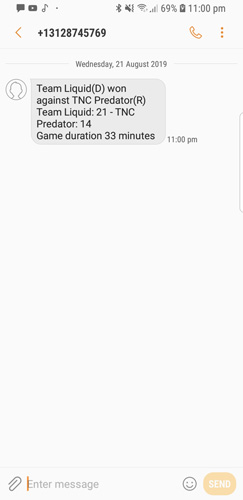
Lambda funcion is set to run every 1 hour trigger by CloudWatch. If the function found my favorite team just finish their match, it will sms me the result. Below is the lambda python code and a screen shot of a sms message.
1 | import os |
Things could be improved:
- set up full CI/CD
- CloudWatch schedule time to only run when the matches are happenning not 24/7
- UI to select favorite team or hook up with Steam account favorite team
I’ll comeback on another day to work on this. Got to go watch the game now…
Let’s go Liquid!
Serverless Blog
So this blog is serverless using combination of hexo, s3, github, codebuild, route53 and cloudfront. My original plan was to build the blog from the ground up with lambda chalice, dynamodb and some hacking with java script. But I thought there got to be someone with the same idea somewhere. One search on google and found two wonderful guides from hackernoon and greengocloud. Thanks to the guides I was able to spin this up within 4-5 hours. I’m still getting use to Hexo and markdown but feeling pretty good that I got it working.
I was struggling a bit with git, the theme didn’t get committed properly. Removed Git Submodule sorted the issue out.
Also CodeBuild didn’t play nice with default role, got to give the role fullS3access to the bucket. It’s working like charm now.
PS: This blog use Chan theme by denjones