terraform
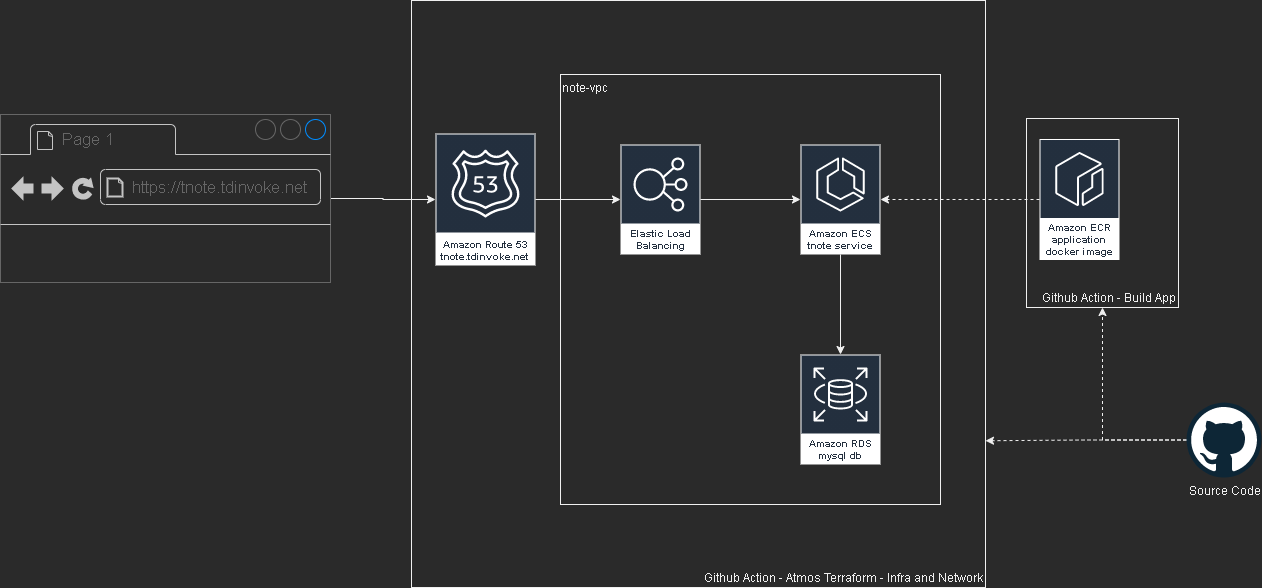
Flask Note app with aws, terraform and github action

This project is part of a mentoring program from my current work - Vanguard Au. Thanks Indika for the guidance and supports through this project.
Please test out the app here: https://tnote.tdinvoke.net
Flask note app
Source: https://github.com/tduong10101/tnote/tree/env/tnote-dev-apse2/website
Simple flask note application that let user sign-up/in, create/delete notes. Thanks to Tech With Tim for the tutorial.
Changes from the tutorial
Moved the db out to a mysql instance
Setup .env variables:
1 | from dotenv import load_dotenv |
connection string:
1 | url=f"mysql+pymysql://{SQL_USERNAME}:{SQL_PASSWORD}@{SQL_HOST}:{SQL_PORT}/{DB_NAME}" |
update create_db function as below:
1 | def create_db(url,app): |
Updated encryption method to use ‘scrypt’
1 | new_user=User(email=email,first_name=first_name,password=generate_password_hash(password1, method='scrypt')) |
Added Gunicorn Server
1 | /home/python/.local/bin/gunicorn -w 2 -b 0.0.0.0:80 "website:create_app()" |
Github Workflow configuration
Source: https://github.com/tduong10101/tnote/tree/env/tnote-dev-apse2/.github/workflows
Github - AWS OIDC configuration
Follow this doco to configure OIDC so Github action can access AWS resources.
app
Utilise aws-actions/amazon-ecr-login couple with OIDC AWS to configure docker registry.
1 | - name: Configure AWS credentials |
This action can only be triggered manually.
network
Source: https://github.com/tduong10101/tnote/blob/env/tnote-dev-apse2/.github/workflows/network.yml
This action cover aws network resource management for the app. It can be triggered manually, push and PR flow.
Here the trigger details:
| Action | Trigger |
|---|---|
| Atmos Terraform Plan | Manual, PR create |
| Atmos Terraform Apply | Manual, PR merge (Push) |
| Atmos Terraform Destroy | Manual |
Auto trigger only apply on branch with “env/*“
infra
Source: https://github.com/tduong10101/tnote/blob/env/tnote-dev-apse2/.github/workflows/infra.yml
This action for creating AWS ECS resources, dns record and rds mysql db.
| Action | Trigger |
|---|---|
| Atmos Terraform Plan | Manual, PR create |
| Atmos Terraform Apply | Manual |
| Atmos Terraform Destroy | Manual |
Terraform - Atmos
Atmos solve the missing param management piece over multi stacks for Terraform.
name_pattern is set with: {tenant}-{state}-{environment} example: tnote-dev-apse2
Source: https://github.com/tduong10101/tnote/tree/env/tnote-dev-apse2/atmos-tf
Structure:
1 | . |
Issue encoutnered
Avoid service start deadlock when start ecs service from UserData
Symptom: ecs service is in ‘inactive’ status and run service command stuck when manually run on the ec2 instance.
1 | sudo systemctl enable --now --no-block ecs.service |
Ensure rds and ecs are in same vpc
Remember to turn on ecs logging by adding the cloudwatch loggroup resource.
Error:
1 | pymysql.err.OperationalError: (2003, "Can't connect to MySQL server on 'terraform-20231118092121881600000001.czfqdh70wguv.ap-southeast-2.rds.amazonaws.com' (timed out)") |
Don’t declare db_name in rds resource block
This is due to the note app has a db/table create function, if the db_name is declared in terraform it would create an empty db without the required tables. Which would then resulting in app fail to run.
Load secrets into atmos terraform using github secret and TFVAR
Ensure sensitive is set to true for the secret. Use github secret and TF_VAR to load the secret into atmos terraform TF_VAR_secret_name={secrets.secret_name}
Terraform and Github actions for Vrising hosting on AWS

It’s been awhile since the last time I play Vrising, but I think this would be a good project for me to get my hands on setting up a CICD pipeline with terraform and github actions (an upgraded version from my AWS Vrising hosting solution).
There are a few changes to the original solution, first one is the use of vrising docker image (thanks to TrueOsiris), instead of manually install vrising server to the ec2 instance. Docker container would be started as part of the ec2 user data. Here’s the user data script.
The second change is terraform configurations turning all the manual setup processes into IaC. Note, on the ec2 instance resource, we have a ‘home_cdir_block’ variable, referencing an input from github actions secret. So then only the IPs in ‘home_cdir_block’ can connect to our server. Another layer of protection is the server’s password in user data script which also getting input from github secret variable.
Terraform resources would then get deploy out by github actions with OIDC configured to assume a role in AWS. The configuraiton process can be found here. The IAM role I set up for this project is attached with ‘AmazonEC2FullAccess’ and the below inline policy:
1 | { |
Oh I forgot to mention, we also need an S3 bucket create to store the tfstate file as stated in _provider.tf.
Below is an overview of the upgraded solution.
Github repo: https://github.com/tduong10101/Vrising-aws

Terraform-AWS serverless blog

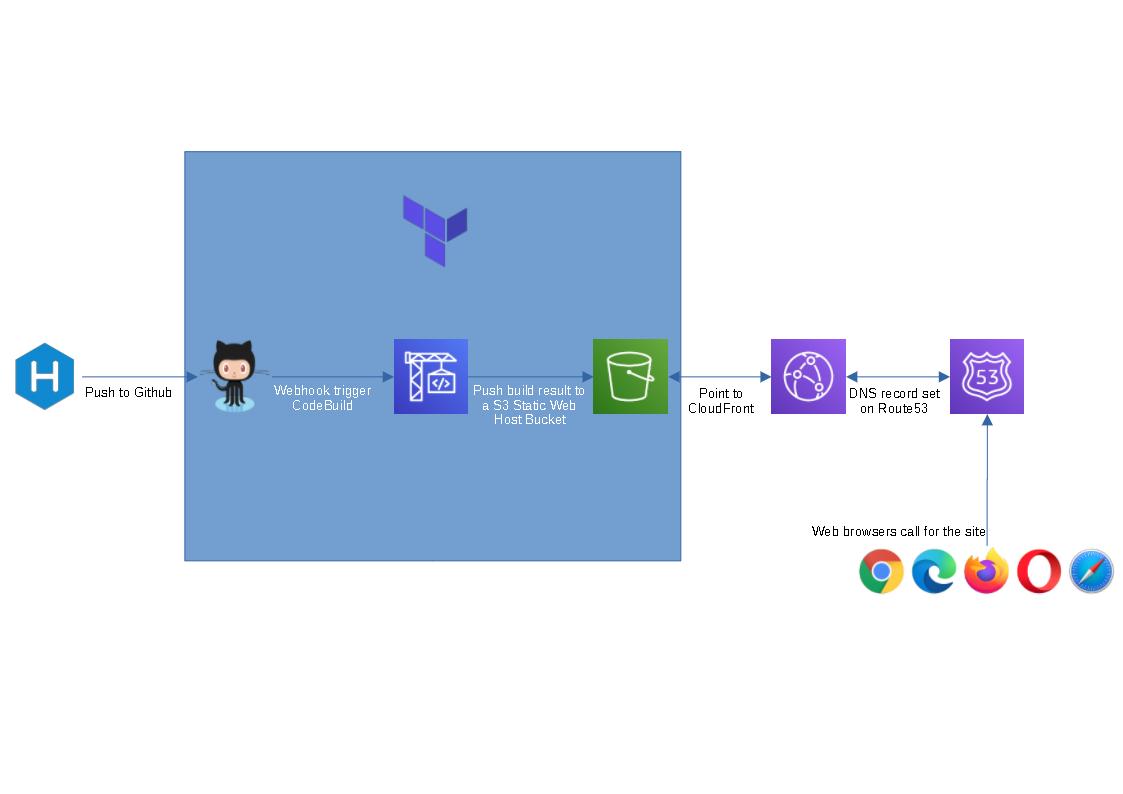
I’m learning Terraform at the moment and thought this could be a good hand-on side project for me. The provided terraform code will spin up a github repo, a codebuild project and a s3 bucket to host a static blog (blue box in the flow chart above). I figure people might not want to use cloudfront or route 53 as they are not free tier service, so I left them out.
To spin this up, we will need the below prerequisites:
Once all the prerequisites are setup, follow the steps below.
- Open cmd/powershell and run the following commands to clone terraform and build spec file:
1 | git clone https://github.com/tduong10101/serverless-blog-terra.git |
- Update serverless-blog-terra/variable.tfvars with your github token and site name that you would like set up
- Run the following commands
1 | cd serverless-blog-terra |
- Review the resouces and put in “yes” to approve terraform to spin them up.
- Grab the outputs and save them somewhere, we’ll use them for later steps.
- Navigate to the parent folder of serverless-blog-terra
1 | cd .. |
Create a new folder, give it the same name as git repo (doesn’t matter if the is not the same, it’s just easier to manage), cd to new folder and run hexo init command
1
2
3mkdir <new folder>
cd .\<new folder>
hexo initCopy buildspec.yml file from serverless-blog-terra folder to this new folder
Update the buildspec.yml with s3:// link from step 5
Init Git and setup git remote with the below commands. Insert your git repo url from step 5.
1 | git init |
- Wait for codebuild to complete update S3 bucket. Logon to AWS console to confirm.
- Open the website_endpoint url on step 5 and enjoy your serverless blog.
Visit Hexo for instructions on how to create posts, change theme, add plugins etc
Remove the blog:
- If you don’t like the new blog and want to clean up aws/git resources. Run the below command:
1 | terraform destroy -var-file variable.tfvars |
- Once terraform finish cleaning up the resources. The rest of the folders can be removed from local computer.